This tutorial will guide you through the process of creating a "Pandora's Battery" and a "magic memory stick," which when used in conjunction can unbrick, restore, and downgrade any PSP firmware. Apart from TA-088 v3 units, the process works on all previous "Phat" and Slim PSP hardware revisions to date.
* A working, homebrew-capable PSP running at least 3.X OE / M33
* Memory Stick Pro Duo with at least 128MB of space
* PSP Battery
Known compatible batteries:
* Sony PSP 1800mAh Battery Pack
* Sony PSP 3.6v - 1200mAh
* Datel PSP Battery 3600mAh 2X
* Datel PSP Battery 1800 MaxPower
* Sony PSP-280 2200mAh
* Atomic Battery Pack 3.6v 1800 mAh
NOTE: PSP units equipped with a TA-085 v2 motherboard or above cannot convert a battery to Pandora. Hellcat's Pandora utility should warn you beforehand if your system board is incompatible.
1. First boot up the PSP into recovery mode (hold R during boot) and make sure the GAME folder homebrew setting is set to 3.X Kernel. Exit recovery mode.
2. Insert the memory stick into the PSP.
3. Navigate to System Settings -> Format Memory Stick on your PSP. Format the memory stick.
4. Connect your PSP in USB mode.
5. Download Hellcat's Pandora Installer for 3.XX Rev 3b
6. Extact the Pandora Installer using WinRAR or any similar utility. Inside, look for a "pan3xx" folder. Copy this folder to "X:/PSP/GAME" on the memory stick.
7. Exit USB mode. Now navigate to the Game menu on your PSP and execute Hellcat's Pandora Installer.
8. Once successfully loaded, you should see a screen similar to the one pictured below.
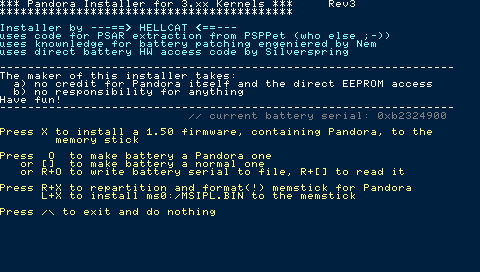
9. Warning: this will delete all data from the memory stick. Backup any files before proceeding. Press R+X, and confirm with R+L+X to repartition and format the memory stick for Pandora.
10. Restart the PSP and connect it in USB mode once again.
11. All folders and files from your memory stick should be wiped, so create a "PSP" folder and then create a "GAME" folder inside of the "PSP" folder.
12. Once again, copy the "pan3xx" folder to "X:/PSP/GAME" on the memory stick.
13. Download the 1.50 update and save it as "UPDATE.PBP" without the quotes.
14. Copy the 1.50 update to the root of your memory stick (X:\UPDATE.PBP, if X is the drive letter of your PSP).
15. Exit USB mode. Now navigate to the Game menu on your PSP and execute Hellcat's Pandora Installer.
16. Press X to install a 1.50 firmware, containing Pandora, to the memory stick.
17. When the process is finished, press L+X to install the IPL. Now exit the application.
18. Connect the PSP in USB mode.
19. Download Time Machine 0.1
20. Extract the RAR using WinRAR or similar utility. Inside, you should see a "TIMEMACHINE" folder. Copy this to "X:/PSP/GAME" on the memory stick.
21. Exit USB mode. Now navigate to the Game menu on PSP and execute the application "Time Machine"
22. You should now be presented with the following screen:

From here, first choose "Install IPL loader on PSP MS boot sector," then select "Convert Pandora/DC1-DC4 IPL into TM format." Now exit the application.
23. Connect the PSP in USB mode.
24. Download Despertar del Cementerio v8
25. Extract the ZIP using WinRAR or similar utility. Inside, you should see a "DC8" folder. Copy this folder to "X:/PSP/GAME" on the memory stick.
26. Download the 5.00 update EBOOT file.
Once finished downloading, the file should already be named as 500.PBP.
If the file name matches, then copy it to the memory stick root (i.e. X:/, if X is the drive letter of your PSP).
27. Exit USB mode. Now navigate to the Game menu on PSP and execute the application "Despertar del Cementerio v8"
28. While installing, the application will ask you which key(s) you would like to bind DC to. Hold UP on the directional pad.

29. After installing the files, the program should exit back to the XMB. That means installation was successful and you are now in possession of a "magic memory stick."
Note: If you have just followed the steps above to create a magic memory stick, steps 1 and 2 below can be safely ignored.
1. Download Hellcat's Pandora Installer for 3.XX Rev 3b
2. Extract the Pandora Installer using WinRAR or any similar utility. Inside, look for a "pan3xx" folder. Copy this folder to "X:/PSP/GAME" on the memory stick. Exit USB mode.
3. Navigate to the Game menu on your PSP and execute Hellcat's Pandora Installer.
4. Upon launching the application, take note of these four options:
First, you will want to press R+O to backup your battery serial. If for any reason you'd like to convert your battery back to normal in the future, press R+[] to restore the battery serial. This is the preferred method for restoring your battery back to its previous state.
If by chance you forgot to back up the battery serial and still would like to convert your battery back to normal, choose the second option by pressing [].
Once you're ready, press O to convert your battery to Pandora.
5. You now are in possession of a Pandora Battery. Booting a PSP with this battery inserted will boot to service mode instead of the normal PSP XMB.
Note: If you are performing the following steps on the same PSP you used to create the battery with make sure to remove and then reinsert the battery.
1. While holding UP on the directional pad, boot the PSP with a magic memory stick and the Pandora Battery inserted.
2. You will be presented with a menu containing the following options:
3. Memory stick LED should begin flashing. Wait 2-5 minutes for the install to complete.
4. Now press X to complete the installation - it's imperative that you do this.
5. Boot up the PSP with a regular non-Pandora battery. You may be presented with a BSOD, but just press X or O to restore settings.
6. And that's it. You're now running 5.00 M33-4.
Requirements
* A working, homebrew-capable PSP running at least 3.X OE / M33
* Memory Stick Pro Duo with at least 128MB of space
* PSP Battery
Known compatible batteries:
* Sony PSP 1800mAh Battery Pack
* Sony PSP 3.6v - 1200mAh
* Datel PSP Battery 3600mAh 2X
* Datel PSP Battery 1800 MaxPower
* Sony PSP-280 2200mAh
* Atomic Battery Pack 3.6v 1800 mAh
NOTE: PSP units equipped with a TA-085 v2 motherboard or above cannot convert a battery to Pandora. Hellcat's Pandora utility should warn you beforehand if your system board is incompatible.
Installation: Creating the Magic Memory Stick
1. First boot up the PSP into recovery mode (hold R during boot) and make sure the GAME folder homebrew setting is set to 3.X Kernel. Exit recovery mode.
2. Insert the memory stick into the PSP.
3. Navigate to System Settings -> Format Memory Stick on your PSP. Format the memory stick.
4. Connect your PSP in USB mode.
5. Download Hellcat's Pandora Installer for 3.XX Rev 3b
6. Extact the Pandora Installer using WinRAR or any similar utility. Inside, look for a "pan3xx" folder. Copy this folder to "X:/PSP/GAME" on the memory stick.
7. Exit USB mode. Now navigate to the Game menu on your PSP and execute Hellcat's Pandora Installer.
8. Once successfully loaded, you should see a screen similar to the one pictured below.
9. Warning: this will delete all data from the memory stick. Backup any files before proceeding. Press R+X, and confirm with R+L+X to repartition and format the memory stick for Pandora.
10. Restart the PSP and connect it in USB mode once again.
11. All folders and files from your memory stick should be wiped, so create a "PSP" folder and then create a "GAME" folder inside of the "PSP" folder.
12. Once again, copy the "pan3xx" folder to "X:/PSP/GAME" on the memory stick.
13. Download the 1.50 update and save it as "UPDATE.PBP" without the quotes.
14. Copy the 1.50 update to the root of your memory stick (X:\UPDATE.PBP, if X is the drive letter of your PSP).
15. Exit USB mode. Now navigate to the Game menu on your PSP and execute Hellcat's Pandora Installer.
16. Press X to install a 1.50 firmware, containing Pandora, to the memory stick.
17. When the process is finished, press L+X to install the IPL. Now exit the application.
18. Connect the PSP in USB mode.
19. Download Time Machine 0.1
20. Extract the RAR using WinRAR or similar utility. Inside, you should see a "TIMEMACHINE" folder. Copy this to "X:/PSP/GAME" on the memory stick.
21. Exit USB mode. Now navigate to the Game menu on PSP and execute the application "Time Machine"
22. You should now be presented with the following screen:
From here, first choose "Install IPL loader on PSP MS boot sector," then select "Convert Pandora/DC1-DC4 IPL into TM format." Now exit the application.
23. Connect the PSP in USB mode.
24. Download Despertar del Cementerio v8
25. Extract the ZIP using WinRAR or similar utility. Inside, you should see a "DC8" folder. Copy this folder to "X:/PSP/GAME" on the memory stick.
26. Download the 5.00 update EBOOT file.
Once finished downloading, the file should already be named as 500.PBP.
If the file name matches, then copy it to the memory stick root (i.e. X:/, if X is the drive letter of your PSP).
27. Exit USB mode. Now navigate to the Game menu on PSP and execute the application "Despertar del Cementerio v8"
28. While installing, the application will ask you which key(s) you would like to bind DC to. Hold UP on the directional pad.
29. After installing the files, the program should exit back to the XMB. That means installation was successful and you are now in possession of a "magic memory stick."
Installation: Converting a Battery to Pandora
Note: If you have just followed the steps above to create a magic memory stick, steps 1 and 2 below can be safely ignored.
1. Download Hellcat's Pandora Installer for 3.XX Rev 3b
2. Extract the Pandora Installer using WinRAR or any similar utility. Inside, look for a "pan3xx" folder. Copy this folder to "X:/PSP/GAME" on the memory stick. Exit USB mode.
3. Navigate to the Game menu on your PSP and execute Hellcat's Pandora Installer.
4. Upon launching the application, take note of these four options:
- Press O to convert battery to Pandora
- Press [] to convert battery to normal
- Press R+O to write battery serial to file
- Press R+[] to restore battery serial
First, you will want to press R+O to backup your battery serial. If for any reason you'd like to convert your battery back to normal in the future, press R+[] to restore the battery serial. This is the preferred method for restoring your battery back to its previous state.
If by chance you forgot to back up the battery serial and still would like to convert your battery back to normal, choose the second option by pressing [].
Once you're ready, press O to convert your battery to Pandora.
5. You now are in possession of a Pandora Battery. Booting a PSP with this battery inserted will boot to service mode instead of the normal PSP XMB.
Usage: Unbrick / Downgrade / Restore Any PSP
Note: If you are performing the following steps on the same PSP you used to create the battery with make sure to remove and then reinsert the battery.
1. While holding UP on the directional pad, boot the PSP with a magic memory stick and the Pandora Battery inserted.
2. You will be presented with a menu containing the following options:
- Install 5.00 M33-4
- Install 5.00 OFW
- NAND operations
- Hardware Info
- Test M33
- Shutdown
- Reboot Device
3. Memory stick LED should begin flashing. Wait 2-5 minutes for the install to complete.
4. Now press X to complete the installation - it's imperative that you do this.
5. Boot up the PSP with a regular non-Pandora battery. You may be presented with a BSOD, but just press X or O to restore settings.
6. And that's it. You're now running 5.00 M33-4.
")